JayR
New member
Kilgen Opus 7722 - Conversion of a Pipe Organ Console to VPO
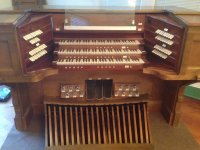
After having played my converted 2-manual Moller pipe organ console, our Church organist expressed an interest in having a virtual pipe organ console for himself. As luck would have it, we were offered a 3-manual Kilgen console built in 1955. I am now in the process of converting this console to MIDI for use as a virtual pipe organ. I have decided to create this thread in an effort to record the process of converting a pipe organ console for use as a VPO so that members of this forum will have a reference and guide for their own conversion projects.
PROJECT SCOPE:
I will be converting this 3-manual console for use as a virtual pipe organ using the HWCE2X, Bundle 1 from MIDI Gadgets Boutique (http://www.midiboutique.com). All keys, stops, couplers, expression pedals, and piston controls will be sent to the MIDI controllers. However, all of the electro-magnet operation of the combination action will be preserved. For console testing and development, GrandOrgue, with free pipe samples, will be used as the organ sound generating software. Hauptwerk, with an adequate commercial sample set, will eventually be used as the permanent sound generation solution. Where ever possible, all original equipment will be preserved and utilized in the final VPO.
CONSOLE DELIVERY:
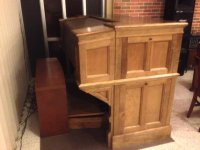
When I first laid eyes on this console, it was delivered in a trailer. It had been disassembled and stored for several weeks. So, I had no idea of what I was facing with this project since I had not seen the console in its original condition. All of the wires leading to the stop jambs and the manuals had been cut. On the bright side, the fact that the console had been disassembled made it easy to move into its new home.
CONSOLE OVERVIEW:
This console is quite massive. The stop jams have a total of 70 stops and couplers. There are 13 toe pistons and 5 to 11 pistons per manual. There is also a cancel per division, along with a general cancel. The expression pedals consist of Choir/Great and Swell. There is also a Crescendo pedal. On one jamb, there is a 6-position Chimes switch. There are pilot indicators for Wind, Crescendo, and Sfortz. The on/off switch is somewhat unusual in that it consists of two momentary pushbutton switches labeled Start and Stop. All of these original features will be preserved and used in the final organ project.
CONVERSION STEP 1 – POWER REQUIREMENTS:
When a console has been removed from its original home, odds are the power source has been disconnected. This makes it a little difficult to determine the power requirements for the console. On this particular console, there is a rather large solenoid per stop jamb. What is unusual about these solenoids is they have a center tap on the coil. So, I took a UPS battery and a multi-meter and measured the current required to activate one of these solenoids. The amperage through the full coil measured comfortably under 6 amps and the center tap measurement was under 3 amps. I am assuming that the center tap is used for divisional pistons/cancels and the full coil is used for general pistons/cancels. When the generals are pressed, the current draw for both solenoids should be 12 amps.
As part of the combination action, there are 13 electromagnets per division. Each one of these electromagnets draws 0.5 amps. When all four divisions are triggered the total current draw for these electromagnets should be 2 amps.
There are 4 relays that control the pistons and one that controls the Great to Pedal Reversible. These relays draw 0.25 amps each.
The MIDI controllers are rated for a 0.5 amp power supply. The indicator lamps are rated for 2 watts each, which is about 0.2 amps per bulb at 12 volts DC.
So, the total power consumption of the console at 12 volts DC should fall just under 17 amps when a general piston is held. This is a fair amount of power; but considering some 650-watt PC power supplies can output 12 volts DC at 52 amps, 17 amps should be feasible without too much cost.
CONVERSION STEP 2 – RECONNECTING & REWIRING - Part 1
Since the wires to the stop jams were cleanly cut, and the connections per division fell under 25 wires per connection, I decided to use DB-type connectors and keep the existing wiring. For the manuals, there are way too many wires per bundle for these types of connectors. So, I will abandon this wiring and run ribbon cable directly from the keys to the MIDI controllers. I am currently in this phase of the project.
More to come…
Last edited:


